So in this tutorial we will be using the Ranger W3D. So get an .BIG extractor and extract all of the AIRNGR" into a directory, which is located in the W3Dbig. Also get the Rngr skin and put it in the same directory which it is located in textures.big". It is called zhca_airanger.tga".
--- You will need a few tools on doing this infantry tutorial so here is the list, and some a place to get them, so show them support by downloading them.
1) Big Extractor - Final Big
2) Gmax - Gmax
3) Renegade Public Tools - RenX
4) W3D Importer - W3DImporter2.zip
Intro
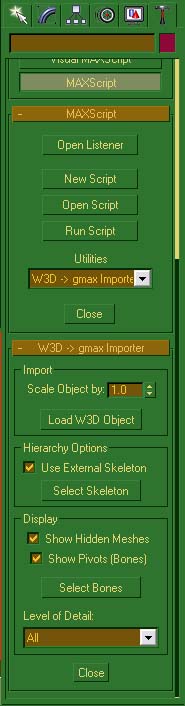
Ok, let's get started. You should have everything installed and already working. Fire up RenX, and go to the right Command Bar. THere are about 5 buttons, and you should click on the Hammer
Next, click on "Max Script" and then select "Use External Skeleton" because this makes all infantry able to use another units animations.
After that you want to select the skeleton of the infantry you are doing. So now go back to your folder with the Ranger infantry and select "AIRNGR_SKL.W3D" and then click on "Load W3D Object" after you have successfully selected your skeleton and select "AIRNGR_SKN.W3D".
Editing the Geometry
Ok, now there is a model with a bunch of stuff on your screen, select the "AIRNGR_SKN" and delete it. Save the file as "InfantryAnimation" and close it. After that, go to File - New and create a new model.
If it asks you if you want to save it, say "No". Then do the same thing, and import the Ranger again, this time delete everything EXCEPT the model. Now you can start doing whatever you want to the model, just try to make it so that the model doesn't change wehre it's legs are positioned and etc.
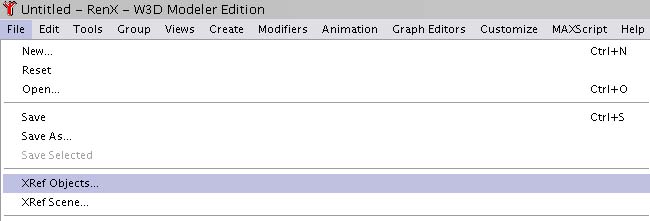
Once you are finished with the model, save it as "Infantry Model" and then open up "Infantry Animation". After you have opened up "Infantry Animation" then you go to File - Xref Objects.
You will now get a Green box that pops up. Select "Add" and then find "Infantry Model" and then select "Ok", click "OK" for everything that pops up. If you left your model in the center, it will go to exactly where it has to go.
*************Warning*************
DO NOT move anything besides the Model.
*************Warning*************
Linking the Bones
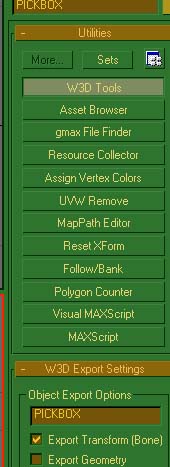
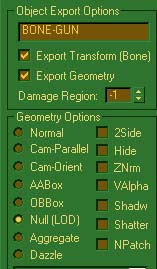
Next select the "pick Box" it is the see-through box around the infantry. And then go to the hammer again, and then go to "W3D Tools" and you will see two check marks that are selected. Uncheck the "Export Geometry" and then save your model as "Infantry+Animation".
Then select "MUZZLEFX01" which is at the end of your gun, and do the same, select Export Transform (bone). Next select "BONE-GUN" and on W3D tools unselect "Export Geometry". And then select "NullLOD".
Now everything is in place, now you have to "Create a Renegade Skin" by clicking on this button.
Place it behind your model, but not touching anything. Select the "X" you have just created, and go to the "Modifiers Tab".
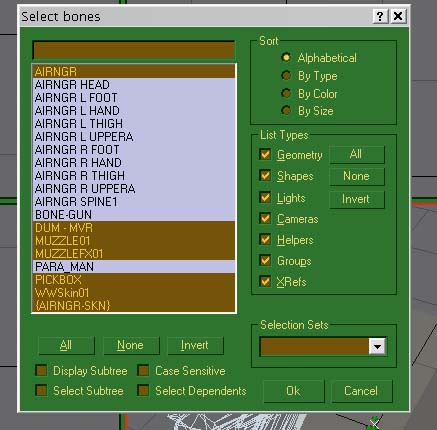
Now go to "Add Bones" and select
Now all of your bones are added, and now you must link them. Click the "Bind to a SpaceWrap" button.
Then select the model. Now select the model, and then it will show under the "Modifiers tab a few buttons, select the whole model, there should be a bunch of blue dots, then click "Auto Link".
The End
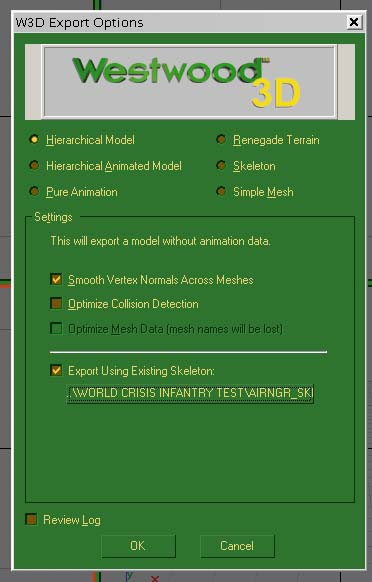
Go to File - Export and select --W3D-- and use these options when exporting.